The Basics of Excavation

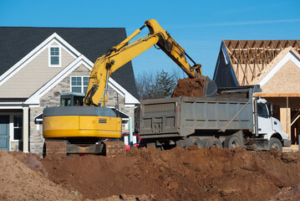
Level Ground Excavation is a crucial part of every construction project. It involves removing dirt and rocks to prepare the site for building.

The excavation process is complex and requires careful planning and execution to ensure the safety of workers. This article will cover the different phases of excavation, including conducting a site survey, developing a detailed plan, and obtaining necessary permits and approvals.

excavation

Site surveys are important because they help an archaeologist determine if archaeological remains are in a location. It also helps them decide the best approach to take at the site, whether excavation or other non-disruptive methods of investigation.

Unlike excavation, which is destructive, surveying allows archaeologists to examine a wide-ranging area of land without damaging it. Survey techniques can include magnetic mapping (using a magnetometer) and electrical resistivity mapping (shooting an electrical current through the ground at intervals to measure soil resistance). Both can identify areas with different materials beneath the surface, such as stone or pottery.

Another important aspect of a site survey is locating underground obstructions, such as natural obstacles or sewer lines. This is essential because repairing or replacing these utilities can be very expensive if they are damaged during construction. Contacting your local utility mapping service or calling 811 before beginning any work at a site is best to avoid these issues.

The survey phase also involves walking over the land recording and mapping any artifacts found on the surface. This can reveal patterns in the distribution of sites within a region, such as higher densities in some neighborhoods than others or patterns of occupation and abandonment over time.

Surface survey requires a lot of walking and can be hard on the feet. However, it’s important to remember that archaeology is a long game: while excavation is like a microscope, survey is like a telescope; both are needed for the full picture.

The planning phase of excavation is critical to ensuring the project goes smoothly. This process involves ensuring the construction plans fit the site, obtaining necessary permits, and handling any other logistical issues that may arise during the excavation project.

The first step in this stage is conducting a thorough site survey to determine the location and extent of the excavation. This is usually done through geological and geophysical data, test pits, and fieldwork. This information will be used to prepare the site for the building by determining the type of foundation that needs to be installed, such as a slab, crawl space, or basement.

Depending on the soil conditions, it may also be necessary to make certain preparations before starting excavation. This can include sloping and benching the trench walls or installing protective systems such as shoring to prevent cave-ins during excavation. Drainage and stormwater management must also be addressed to ensure the excavation is not compromised by soil erosion or flood water.

Another important aspect of this stage is clearing the site. This includes removing existing trees, shrubs, structures, and debris from the excavation area. It is also important to mark the boundaries of the excavation with a hard barricade and signs. Establishing parking areas for heavy equipment, worker parking, and a place to store the earth that will be moved during excavation is also a good idea.

Finally, it is a good idea to arrange power during construction and locate underground utility lines that must be avoided. Having these details worked out in advance can save time and money during the project by preventing delays.

Before excavation begins, any necessary preparations must be made. This may include surveying, clearing the site, and removing existing structures on or above ground. It may also involve performing soil testing if needed. This will determine how well the soil can bear the weight of any structure built on it and how well it will absorb moisture.

Additional preparations may be necessary depending on the type of excavation. Rock excavation, for example, requires drilling and blasting to remove large rocks and boulders that would otherwise be too difficult to dig through. Other specialized types of excavation are drainage, which involves creating trenches and canals to redirect water flow, and underground, which consists of excavating tunnels for pipes, utilities, or transportation.

Another important part of this phase is ensuring that the excavation site is protected from damage by securing it with barriers and warning signs. It’s also important to pause any electrical and other potentially hazardous connections near the excavation site. This will prevent accidents and reduce the risk of damage to the surrounding area.

The final step in this phase is preparing the site for actual excavation work by clearing the land, compacting it, and laying the foundation. Utilities such as plumbing and electricity are also installed at this point if necessary.

At this stage, it’s also a good idea to perform regular inspections of the excavation site to ensure everything is progressing as planned and that any issues are quickly addressed. This is particularly crucial for large construction projects, which require significant time and resources to complete. A thorough plan and careful excavation process will help ensure that the project is completed on schedule and within budget.

Before the digging phase of excavation begins, workers should take a moment to prepare the area. For example, they may put up barriers or flags to warn people of the dangers of entering the area. They might also ensure the air is tested for low oxygen and hazardous gasses and vapors. In addition, they might set up corner benchmarks to give them a reference point for the site level. Finally, they might dig up a sample of soil for testing.

The next step is to dig the project’s foundation, which typically involves digging trenches to lay pipes for water, sewage, electrical lines, and more. Workers will use precision equipment to ensure the site is excavated to the right depth and location. Depending on the site, they might even tunnel through solid rock.

If the site is on an unstable slope, a trench must be dug to stabilize it. They might also use this opportunity to install a drainage system. This is often done to reduce the risk of flooding and other construction problems.

Other types of excavation include rock excavation, which removes large rocks from a site. This can be done by hand or with the help of specialized machinery. Earth excavation is another type, which strips layers of dirt away from the ground and can include grading. Shoring is the process of supporting the walls of a trench to prevent collapse or cave-ins. This is especially important for excavation, that involves working in deep holes where it’s easy for the walls to collapse and crush workers. This is why you might see companies using trench boxes, which fit into the trench and prevent them from collapsing on employees.

Once excavation is complete, archaeologists begin post-excavation analysis to process finds and environmental samples. This includes identifying and classifying artifacts, analyzing assemblages, and creating records ready for publication. This phase can be especially time-consuming, but it is necessary to ensure that all findings are properly cataloged. It also allows archaeologists to make any adjustments required for future excavations.

Conventional fieldwork procedures today involve a sequence of sub-projects:

  • Desktop assessment and ground-based evaluation are ideally articulated in an outline deposit model.
  • You are setting a model beside evolving research agendas to define an excavation strategy for data gathering.
  • We are undertaking stratigraphic analysis and the assessment of assemblages, as per MoRPHE, to decide priorities for further specialist analyses.

It can also be complicated because redefining initial interpretations as new archaeological information becomes available needs to readily map onto the fragmented commercial context in which much such work now takes place, with specialist outputs paid for shortly after excavation. This is a major reason why many synthetic publications are hesitant to explore the underlying documentation: a reader may be left feeling that an archaeological site needs to be properly analyzed and interpreted.

The emergence of increasingly accurate dating methodologies also transforms this part of the analytical process. These allow archaeologists to provide a more precise chronology of the artifacts that have been recovered and the archaeological layers that they form a part of. This, in turn, will help them better understand the contexts in which they were found and how they relate to one another.

How to Choose the Right Roofing Materials

The roof is a major part of the building envelope. It provides protection against rain, snow, sunlight, and extremes of temperature.

Roofing

It may be constructed from a variety of materials. Typical modern Roofing are metals, such as galvanized steel or standing seam. Wood roofs, such as cedar (popular in Cape Cod cottages and Craftsman-style houses) or redwood, have a natural look but can deteriorate quickly in wet climates.

The roof is one of the most important parts of a building. It protects the structure from various weather conditions and is a key factor in determining the health and longevity of the construction. It is therefore crucial to choose the right roofing materials for the job. Not only does this ensure that the structure will be durable and long-lasting, but it also helps protect the occupants of the building from heat, cold and moisture damage.

The type of roofing material to use depends on the climate in your area. For example, a roof that will be exposed to a lot of rainfall will need to be built from a waterproof material like slate or clay tiles. Similarly, a roof that is in an area with high humidity levels or frequent storms will need to have a sloping roof so that rainwater and snow can easily drain away.

Lastly, it’s worth considering the insulation of your roofing system. A well-insulated roof will help prevent overheating and reduce your energy costs by reducing the amount of energy required to keep your home or business warm in winter and cool in summer. A professional can recommend the best type of insulation for your home or business and install it correctly to avoid any leaks or gaps.

Finally, the monetary cost of each roofing material should be considered. In the short term, more expensive roofing materials may appear more costly than cheaper alternatives; however, they are often less likely to need replacement or repair and will last longer. Also, a durable roof that requires little maintenance can save you money in the long run by reducing your energy costs and preventing any water damage that could lead to mold or mildew.

Underlayment

The roof underlayment is a very important part of the entire roofing system. It sits right on top of the decking and works as a redundancy in case the outer layer becomes punctured or damaged. It’s also a key to ensuring your roofing will last as long as possible.

Underlayment materials are usually either felt or synthetic, and both can be used with a variety of roofing systems. Felt underlayment is what most homeowners are familiar with, and it’s been in use for years beneath asphalt shingles. Synthetic underlayments are newer and offer a few advantages over felt when it comes to working with the roof.

Felt underlayment can be made from either recycled paper or organic cotton. It’s thicker than synthetic underlayments and is often a good choice for homeowners who have a limited budget. However, it can be difficult to work with, especially during installation. It’s prone to tearing and it can be easily wrinkled, so roofers must take extra care in its placement. Felt also tends to soak up moisture, so it needs to be replaced quickly after installation.

The primary function of underlayment is to prevent moisture damage and protect the underlying subfloor from moisture and other environmental factors. It’s also designed to provide a slight buffer between the flooring material and any roughness or imperfections in the subfloor. This is particularly useful for older homes, where the floor may be constructed with boards instead of OSB or plywood sheets.

Foam underlayments are ideal for a variety of flooring types and can help to reduce noise, increase insulation, and create a barrier between the subfloor and flooring material. It’s also environmentally friendly and provides a little cushion, which is great for people who spend a lot of time on the floor.

Cork underlayment is another popular option and can be used with floating or glue-down installations. It’s soft, which helps to absorb sound, and it is naturally mold resistant. Cork is also eco-friendly and often receives green building certifications. However, it doesn’t create a moisture barrier and may need to be paired with a vapor or water barrier.

Flashing

Flashing is a thin sheet of metal that’s bent into place around a joint in your roof. It’s especially important in places where water might leak into your house, such as where a wall meets the roof, or the low points of the roof (also called valleys) where two slopes meet. It’s also crucial around roof protrusions like chimneys, skylights and vents.

Most serious roofing projects include some form of flashing. It’s a good idea to hire a professional for the job, since incorrect installation could lead to leaks and other problems. Flashing is usually made of aluminum or galvanized steel, though copper and lead are sometimes used as well.

When installing flashing, it’s critical to ensure the material can expand and contract with temperature changes. If the material is too rigid, it may crack or break when the roof expands and contracts, allowing water to leak in. Flashing is generally installed between the underlayment and the shingles, but it can be placed on top of the roof panels as well in some cases.

Different types of flashing are used for different purposes. There are a few main categories:

Step flashing is one of the most common types of flashing, and it’s the type you’ll find around chimneys and other roof penetrations. It consists of rectangular pieces of flashing bent into an L-shape, with the base of each L secured to the brick wall and the top secured to the roof. This lining creates a watertight barrier at the point where the wall and roof meet.

Other types of flashing are available for use in various areas of the roof, including in roof valleys and around dormers. Some are long sheets of flashing that are shaped to fit the valley, with shingles covering it for a water-tight seal. Others are small flashing squares that can be bent to line a joint.

There are other types of flashing, too, such as lead and polyvinyl chloride (PVC), but aluminum is typically the most popular because it’s cheap and easy to work with. It’s also relatively durable, and it doesn’t rust or develop other forms of corrosion as easily as some other metals can.

Shingles

Asphalt shingles are the most common roofing material for residential structures in the United States. They come in multiple styles, including traditional three-tab shingles and multilayered architectural laminated shingles. While architectural laminated shingles cost more than 3-tab shingles right out the gate, they can save homeowners money in the long run because of their durability and longevity.

When evaluating different roof materials for your home, it’s important to consider your climate. For example, the Atlanta area experiences a wide range of weather conditions, from powerful thunderstorms with damaging winds and large hail to winter storms complete with snow, sleet, freezing rain, and strong winds. You want your new shingle roof to be able to stand up to these extremes.

Look for impact rated shingles, which are specifically designed to resist damage from wind-driven hail. This will help reduce your risk of costly roof repairs over time, and it can protect your home’s interior as well as its contents.

The shingles virus travels in nerve fibers, which is why shingles often appear as a band of painful blisters on one side of the body. While the blisters scab over in 7 to 10 days, some people experience persistent pain for several days after the rash appears. This is called postherpetic neuralgia, and it happens when damaged nerve fibers send confusing and exaggerated messages of pain from your skin to your brain.

While it’s rare, shingles can cause permanent scarring. This can affect a person’s quality of life, making it difficult to go outside, hold a job, or even walk. Shingles can also lead to eye infections, which may lead to blindness in severe cases.

Choosing the correct roofing shingles can make your home look more appealing, as well as protect it from potential problems. For this reason, it’s important to evaluate your options and discuss them with the roofing professionals you choose. They can help you find the best solution for your home and budget. The more prepared you are for your roof installation, the less stressful it will be. This way, you can spend more time with your family and focus on work without having to worry about repairing or replacing your roof.

Landscaping and Retaining Walls

Retaining walls offer a unique and eye-catching look to any landscape. They also serve important functions like protecting your property from landslides and floods. For more information, visit this Website.

A retaining wall is an engineering structure that professionals should only build. This includes a certified landscape contractor knowledgeable in building codes and engineering considerations.

Soil erosion can be a serious issue for homeowners who live on sloped terrain. It can damage your yard, ruin garden beds, cause drainage issues, and even run off chemicals from fertilizer into nearby bodies of water. Fortunately, soil erosion can be prevented with the use of retaining walls. Retaining walls are structures that hold back the soil on a sloped property to prevent it from washing away during heavy rains. In addition to preventing erosion, retaining walls improve drainage and add usable space to your landscape.

Various factors can cause erosion, but the two leading causes are wind and water. If you have a sloped yard, erosion is a real concern that can be expensive to repair and dangerous for your family or pets. A retaining wall can make your yard safe and more functional for you and your loved ones.

During heavy rains, erosion is a natural phenomenon that can occur in un-leveled areas of your yard. The force of the rainwater can be so strong that it sweeps the dirt and rocks up a slope and away from your home. The best way to avoid this is by using a retaining wall that has been properly constructed and designed.

The design of a retaining wall will take into account the size and character of the soil it is built on. It may be necessary to include a backfill that will be porous enough to help water flow through it and relieve pressure on the wall. Weep holes are also often incorporated into the construction of a retaining wall, which helps prevent water buildup and allows for drainage.

When your retaining wall is designed correctly, it will be able to withstand the pressure from erosion and other forces without collapsing. Working with an experienced landscaping company that understands the challenges of building a retaining wall is important. If the retaining wall is designed and constructed correctly, it can quickly collapse or become muddy and dangerous.

Retaining walls help control flooding on residential properties. They can also be used on commercial and industrial projects to prevent erosion and flood damage. Besides helping with erosion, retaining walls can increase stability and safety by controlling water flow in sloped areas. These walls can be constructed in various styles to suit your landscaping or property architecture style. They can even be tiered to allow more space for your garden or other home structures.

Retain walls can also prevent flooding by keeping the soil in place and directing water away from your house. This is important because standing water can damage the foundation of your home. Floodwaters also carry sand and silt that can cause further structural damage to your home.

Flooding can happen when the ground soil is washed away or when a river or stream flows into an area with poor drainage. It can also occur when the water is sloughed off by a heavy rainstorm or during snowmelt.

The good news is that if you have a newer retaining wall, you are unlikely to be responsible for any flooding it causes on your neighbors’ property. However, if the wall was built without a permit and has been compromised by erosion or other factors, you might be liable for any damages.

Despite their practical uses, retaining walls can be visually unappealing and detract from the beauty of your yard. They can also be a costly project to repair, especially for DIYers. It’s best to hire a professional team that understands how to build and maintain these walls to avoid potential problems.

Retaining walls are a popular choice for homeowners to curb erosion and flooding. They can be constructed using various materials, including concrete, treated timbers, natural stone, and boulders. They are often used to bind soils between different elevations or to support terraced gardens and filled earth. In addition, retaining walls can add to the value of your home by enhancing its landscape and providing a beautiful vista. They can also be used as a backdrop for plants and flowers, which further help retain the soil they are planted in.

If you live in an area with a lot of erosion, a retaining wall can save your property and keep your home intact. However, if you don’t maintain your retaining walls, you may see them start to tilt or sink. If this happens, you’ll need to get a professional mason in to fix the problem so it doesn’t become worse.

Tilting and sinking retaining walls can occur for several reasons. One reason is that water pressure builds up against the wall, which can cause the soil to erode. Another is that weep holes are created in retaining walls during installation to allow drainage to be clogged. If weep holes are clogged, it will force the water to gather next to the wall, and over time, it can cause the foundation of the retaining wall to weaken or even collapse.

Another reason for retaining wall issues is that the structure must be built or waterproofed correctly. When a retaining wall isn’t waterproofed, it can leak, which can damage the structure and the landscaping surrounding it.

Retaining walls also help with erosion control by redirecting water flow away from homes. This can prevent freeze-thaw cycles that can wreak havoc on a home’s foundation and lead to expensive repairs.

A retaining wall can also create level areas on sloping sites, stabilize natural slopes, and build terraces for infrastructure like roads or driveways. Many types of retaining walls are available, including gravity and cantilever walls; MSE, counterfort, or buttressed walls; and gabion and crib walls.

No matter what type of retaining wall you have on your property, it is vital to check for problems regularly. A reputable landscaping company can inspect your retaining wall and recommend maintenance to prevent future erosion, flooding, and sinking of the structure and its foundations. They can also waterproof your retaining wall to protect it from weather damage and ensure its longevity. If you notice any problems with your retaining wall, contact a professional landscaping company to schedule a visit and a quote before the ground starts freezing.

The law regarding property lines and retaining walls varies by region, so it’s important to check the laws in your area. The general rule is that a retaining wall must be on the land its owner occupies or has an interest in. However, there are exceptions.

For example, a retaining wall can be built with a common law right of lateral support for land. If this is the case, it can straddle the property line, and costs will be apportioned according to the benefit received by each party. Good communication and agreement between neighbors is key to preventing conflicts later on.

Generally, the property owner who owns the land where the retaining wall is located is responsible for maintaining it. However, the retaining wall owner must ensure that the structure does not cause damage to neighboring properties or structures. This includes providing the retaining wall is not causing drainage problems or subsidence. It is also important to protect retaining walls from repeated impacts, such as those from vehicles or children playing on the ground.

Another consideration is whether the retaining wall has been constructed without approval. If it has, the retaining wall owner is responsible for repairing it and may be required to compensate the neighbor.

The rules about retaining walls and property lines can be confusing. However, it is important to know the laws in your area and understand them well to avoid issues down the road.

Retaining walls is a great way to add curb appeal and value to your home, but they can also be problematic if not properly maintained. Remember the tips above and use a professional to help build and repair your retaining walls.

In addition to a retaining wall, you might need to install a fence on your property. Fences differ from retaining walls, so you must follow different laws when building them. You should check with your local city to see what the laws are before you start construction.

How to Choose and Maintain a Vinyl Fence

Choosing the best Vinyl Fences Tampa depend largely on your specific needs. Ultimately, you’ll need to choose a manufacturer that offers durability.

Vinyl Fence

You can research the manufacturing process and the company that stands behind it. This is important as independent contractors are often long gone by the time warranty claims arise.

Unlike traditional wood or metal fences, vinyl fences do not require sanding, repainting, or staining. They are also not susceptible to rusting or termite infestations. Instead, they simply need to be hosed down from time to time with water. They can even be rinsed with a power washer, if needed. Occasionally, mildew and mold may start to build up on the surface of a vinyl fence. In these cases, you will need to use a solution of bleach or white vinegar mixed with water to clean the mildew and mold off the surface of your vinyl fence. Once the area is cleaned, you can hose down the vinyl fence again.

During your regular hosing downs, it is also a good idea to inspect your vinyl fence for any loose or damaged components. It is important to make sure that all of the connectors are tight and secure, and if any are loose or broken, you should re-tighten them with a screwdriver or wrench. It is also a good idea to check the posts and posts for any damage, as well as any areas where the vinyl has started to discolor.

Once you have finished your regular hosing downs, you can also wash the surface of your vinyl fence with soap and water to remove any stubborn stains. You can also find special vinyl cleaning products on the market that are specifically designed to restore and shine your vinyl fence. If you are not interested in using cleaning solutions, you can always use a soft brush or garden sprayer to scrub the dirt off your vinyl fence.

During the winter, you will want to hose down your vinyl fence frequently to remove any snow or ice buildup. You should also be careful when using a power washer or a metal broom on your vinyl fence, as these can cause it to scratch or damage. If you are unable to remove the snow or ice with your hose, you can try using a plastic shovel or broom with soft bristles to avoid scratching or damaging the surface of your vinyl fence.

Long-Lasting

Vinyl fences are long-lasting compared to other fencing options. They do not break down or get rusty due to moisture or extreme heat like other materials can. They also do not rot or swell. It is easy to maintain a vinyl fence by simply cleaning it with water and soap. They do not need to be repainted and can resist the attack of termites. They are a great choice for seaside homes as they do not get corroded when exposed to salt water and can withstand high winds.

A lot of people are hesitant to choose a vinyl fence because it is made from a plastic material. Some people think it is not environmentally friendly and should not be recycled. However, vinyl can be fully recycled at any time of its life. It can be used to make new vinyl fences and is not sent to landfills where it can pollute the environment.

Another advantage of vinyl is that it can increase the curb appeal and property value of your home. It comes in a wide variety of colors and styles to match your taste. In addition, it can be installed around pools and patios. It also adds security and privacy to your home and can protect your pets from getting into the pool or garden.

In comparison, wood fences are prone to algae, deterioration due to the sun’s harmful rays and other factors that break down the material. They need to be stained, sealed and painted every few years to keep them looking good and functioning properly. If you do not take the proper care of your wood fence, it may only last for 20 to 30 years or less.

If you are looking for a low-maintenance fencing option, a vinyl fence is the right choice for your home. It will look beautiful for as long as you own your house and is an investment in the property value of your home. It will also increase the curb appeal and beauty of your property and neighborhood. It can also act as a boundary marker and can be used for many purposes, such as keeping pets safe, separating children from the garden or swimming pool, and acting as a security measure.

Easy to Install

A vinyl fence is a great way to define your property, increase privacy and keep kids and pets safe. It is also a relatively easy home improvement project that you can do yourself. Using the right tools, you can install your vinyl fence in just one weekend. However, there are some important things to consider before you start the job.

The first step is to make sure that the fence you want to build is legal in your area. Check with your city or your HOA (if you are part of one) to see if there are any restrictions on fence heights, locations and types. You should also check with your local utility companies to find out if there are any underground lines that need to be marked before digging any post holes. It is extremely dangerous to hit a line and can cause severe damage.

Next, you will need to prepare the site for your fence. Use landscape stakes to mark the intended fence line, including corners and gates if you plan on having any. Once you have staked the fence line, tie a string between each corner post to mark where the fence panels will go. This will ensure that the posts are placed properly to hold up your new vinyl fence.

Once you have dug your post holes, it is a good idea to add gravel at the bottom of each hole. This will help the post stand up straighter when concrete is added and it helps with drainage. If you don’t do this, the post may sink into the ground over time and become damaged.

When you are ready to install your vinyl fence, follow the detailed instructions that came with it. Make sure to use recommended brackets and screws, as well as the proper amount of concrete for each post. After the concrete is set, you can then install your vinyl fence panels.

Remember to leave a small gap, less than an inch, between each panel so that it can expand and contract in extreme weather conditions. This will prevent the vinyl from becoming warped or damaged over time.

Environmentally Friendly

Unlike wood fences, which require constant staining and painting to stay looking beautiful, vinyl fences look great year after year. All they need is a little soap and water to keep them looking pristine. This not only saves you time and money, but it also cuts down on your environmental footprint.

Another reason why vinyl is eco-friendly is because it’s made from a plastic material that does not degrade over time. In fact, it can last decades without losing its vibrant appearance or becoming discolored. This helps to reduce your overall waste and recycling levels, as well as reducing the amount of chemicals that are released into the environment.

Additionally, vinyl does not break easily in the cold weather. This is especially important in areas like Texas that experience extreme temperature changes throughout the year. This means that you won’t have to worry about your fence getting brittle and breaking in the winter, which would be a big problem with most other types of fencing materials.

This type of fencing is also great for seaside homes, as it does not get corroded from the salty ocean water. This is because it is non-porous and does not absorb the water like other materials do. It is also resistant to insects, which means that you won’t have to worry if it gets infested with termites or carpenter ants.

One of the most common reasons for homeowners to choose a fence is to add privacy to their property. This is especially important if they have children or pets, as a fence can help to keep them safe and prevent them from wandering away. A vinyl fence is ideal for this, as it can help to block out any noise from the outside world, such as cars or people on the street.

A vinyl fence is also a good choice if you have a pool, as it can help to keep the children and pets out of the water. In addition, it can help to block out the sun, which can be a major factor in keeping your yard cool and comfortable.

What You Need to Know About Roof Repair

Roof Repair Near Me is the process of fixing damaged sections of a roof. Homeowners should regularly inspect their roof for signs of damage like water stains, shingle granules in gutters and sagging.

Roof Repair

Some roof repairs can be done by the homeowner, but homeowners are advised to leave most major repairs to professional roofers. Labor and materials make up the bulk of roof repair costs. Other factors that influence price include roofing material, roof pitch and design, and roof features.

A ridge cap is the point of a roof where the slopes change positions. This area is usually capped with triangular pieces to prevent cracking or leaks that can form underneath the shingles or tiles. It’s also important to keep your ridge cap in good condition because it helps your home resist weather elements like rain, snow, and wind. If your ridge cap gets damaged, you’ll want to have it replaced as soon as possible in order to ensure the rest of your roof is protected properly.

Ridge caps come in a variety of colors, shapes, and sizes to match the overall look and design of your roof or building. They can also add to the value of your property and improve its curb appeal. In addition, a well-maintained ridge cap provides proper ventilation to help control the temperature and moisture levels in the attic or roof cavity, which can be helpful for maintaining the health of your building.

The cost of repairing your ridge cap will depend on how much damage it has suffered and what type of material you choose to replace it with. Generally, it costs $250 to $750 to repair a ridge cap and apply fresh mortar. You can expect to pay more if you decide to use ridge vents along with your new ridge cap.

This is a fairly easy DIY project, provided that you’re comfortable working at heights and using roofing materials. You’ll need to make sure your ladder is positioned in a safe location and that you’re wearing the appropriate safety gear before starting work. Also, make sure you have plenty of cleaning supplies on hand to remove any debris and old cement from the surface before you start removing the ridge cap shingles.

Chimney Flashing

The chimney flashing is a critical part of the roof because it protects the joint where the chimney meets the roof. If it is damaged, water can enter the joint and cause leaks and moisture damage to the chimney and roof structure. It is important to have a professional repair the flashing as soon as possible to avoid serious roofing issues and costly repairs.

Chimney flashing is a metal strip that prevents water from seeping into the roof and chimney structure. It is made of copper, galvanized sheet metal, or terne-coated stainless steel. The material that is chosen depends on the roof material, design, and climate. Copper is considered the ideal flashing because it will last for decades and looks beautiful. However, it is the most expensive option. Galvanized sheet metal is less expensive and does not corrode as quickly as copper. However, it is prone to cracking and can break easily.

Chimney flashing needs to be installed correctly and inspected regularly for signs of leaks. A leaky chimney flashing can lead to water damage to the roof, attic insulation, ceilings, walls, and property within the home. Leaking chimney flashing is almost always caused by a problem with the chimney-to-roof joint. Chimney flashing is designed to respond to expansion and contraction of the roof and chimney, so if it is not properly insulated or sealed, it can develop leaks and allow water into the house.

Replacing the chimney flashing is a difficult job that requires skilled and experienced professionals. The flashing is replaced in stages, and there are many steps involved to ensure a watertight seal. A contractor will remove the existing flashing and shingles, then install new base flashing, step flashing, and counter flashing.

Verge Repair

Roof verges are the outer edges of your roof at gable ends. Traditionally these were fixed with mortar, this stopped living things and water from infiltrating your roof space but, over time, this method is not very durable – thermal movements and the weather can cause the mortar to deteriorate. This leads to moisture ingress, damp walls and the risk of leaks.

Luckily there is a solution, we can repair the verge using our dry verge system which offers a secure and robust alternative to traditional mortar. It costs slightly more than repointing but it’s more than worth the investment – dry verge caps last much longer than masonry and are designed to withstand high-speed winds.

We can also supply and fit fringe tiles which offer a neat and tidy finish to your verge. These tiles are manufactured from clay and can be supplied in a range of colours that match your existing roof tile colour. They are also made from strong materials that protect the verge from water ingress, wind uplift and a variety of environmental damage.

If your verge is in need of repair or you want to update the look of your roof, contact the team at Hall Aspects Of Roofing on 01642 323025 and we can recommend and install the best solution for you. We have access to a wide range of Redland and Marley products so there is sure to be something perfect for your home.

Often it’s not just the roof that needs attention, the guttering may also need replacing. This is an important aspect of any roof as it can cause significant water ingress, damp and mould problems if not properly maintained. We can help with both the repair and replacement of guttering and downpipes.

Roof Valley Repair

Roof valleys are prone to leaks and deterioration from rainwater, debris, snow, and other weather. Located where two descending slopes meet, they require special waterproofing to prevent water or ice from gathering and damaging the structure of the roof.

If left untreated, a leaky roof valley will cause more serious problems for the whole roof and can be very costly to repair. For this reason, we recommend that you take a proactive approach to preventing leaks from your roof valley by carrying out a regular inspection of the area using a tall ladder or binoculars. A regular roof cleaning schedule and lopping off any overhanging tree branches is also a good idea as this will help to maintain the integrity of your roof and prolong its lifespan.

An experienced residential roofing company can provide a range of services to protect the integrity of your roof and reduce the risk of leaks. In many cases, a small amount of roof sealant can be applied to the source of a leak in the roof valley as a temporary measure, although this will only work for a limited period of time. It will be necessary to carry out a full repair, including the removal of all the shingles around the area, replacing the flashing and installing new ice and water shield underlayment and re-shingling.

Depending on the extent of the damage to your roof valley, this may be a relatively simple or complex task. Generally, your roofing contractor will start by inspecting the area and then clearing away any loose or damaged shingle debris. Next, the roofing contractor will cut a piece of sheet metal to fit the valley and then bend it to the shape of the roof and fasten it in place with roof cement.

Rafter Tail Repair

The rafter tail is the end of a wood structural truss that projects beyond the exterior walls. It is often scrolled or detailed and serves as a key support for the soffit overhang. In older construction the rafter tails are exposed, but in newer structures they are boxed in with fascia and soffit materials to protect them from water damage. As they are exposed to the elements rafter tails can experience dry rot that needs to be addressed immediately, especially when it is noticed as soft or spongy wood.

Assuming that the rotting is limited to the last few inches of the rafter tail, the repair can be a relatively easy fix. Begin by prying off the damaged section of fascia board, taking care not to damage any fascia boards that are not rotting. Pull off the soffit material to expose the rotted rafter tail and cut it off with a saw. Cut a piece of 2-by-4 or 2-by-6 pressure treated lumber to twice the length of the rafter tail for a small repair, or three times its length for larger repairs. Drill pilot holes for 3-inch wood screws through the new rafter and into the existing rafters, making sure to drive them into the ends of the joists.

5 Eye-Catching Bathroom Remodel Designs

Milwaukee Bathroom Remodeling can add bold paint colors, and unique mirrors can add flair to your remodel. Simple touches like new towels, rugs, and decor can make your room feel alive.

bathroom remodeling

Mirrors make rooms feel bigger by reflecting natural light and creating depth. Whether working in a small space or trying to balance an already crowded room, the right mirror can make all the difference. Plus, mirrors are an easy and cost-effective way to upgrade your bathroom without putting in permanent touches like custom tile or expensive fixtures.

Depending on the style you’re going for, your bathroom mirrors can be a great focal point or a subtle accent. A simple, rectangular frame will fit most bathrooms, but a custom design adds character. Choose a bold geometric shape for a modern look or something more traditional, like a beveled edge. You can even play with color by choosing a matte black finish that coordinates with other elements in your bathroom remodel, like the faucet, towel holder, and floating shelves.

Another option is to go completely frameless and create a sleek, minimalistic aesthetic. This works well for modern and industrial styles. You can also incorporate other materials to give your bathroom a more organic, rustic feel. A natural wooden frame will tie into wood countertops or a farmhouse-inspired vanity and can inspire other design choices like an organic pendant light or wooden bathroom shelving.

If you want to add an extra dimension to your bathroom, try layering mirrors. Not only does this create a unique, textured appearance, but it also increases your lighting options. You can use two different mirror shapes to create a layered look like this bathroom or even opt for a full wall of mirror panes.

Adding decorative trims or shapes lets you get creative with the framing. This helps to highlight other design features in the room, such as a bold backsplash or a pop of color on the walls. This bathroom’s asymmetrical mirrors with an oversized frame and a gold accent piece add to the contemporary yet rustic vibe of the space.

Mirrors can also be a good way to hide imperfections on your walls until you can afford or are ready to fix them. This is especially useful if you’ve recently switched from one sink to two or back again. You can even use a large mirror to cover up dated wallpaper until it is right for removal.

While some may assume bathroom color schemes must be bright and bold, a soft, neutral palette can also feel luxurious. If you choose the right shades of white, gray, and other neutrals, your space can look elegant and contemporary while also allowing you to incorporate stylish decor elements. Light colors also reflect light easily, making your bathroom appear bigger than it is.

If you need help deciding what paint to choose for your new bathroom, consider consulting a color wheel. The wheels can help you find shades that complement one another and give you an idea of how a color will play out in different rooms of the house. For example, blue and green are opposite on the color wheel, but they can work well together if you pair them with shades like pink and yellow.

Opt for a soft shade of gray for a classic bathroom that will never go out of style. This bathroom paint color creates a soothing backdrop that pairs nicely with sleek granite or marble countertops and modern bathroom fixtures. You can keep the room feeling fresh and airy by choosing white tile for the floor, or you can add a splash of color with accent walls in bright or pastel hues.

Brown bathroom hues aren’t as common, but they can offer a spa-like feel and look beautiful with many types of décor. You can opt for chocolate brown or a lighter, more neutral shade that minimizes shadows and makes your bathroom look spacious.

Green bathroom paint colors can offer a sense of tranquility and nature. They’re a great choice for bathrooms with natural wood materials and can also be used to complement a garden-inspired motif or a country cottage aesthetic. Lighter green hues like sage and mint are popular for bathroom color, but you can also experiment with olive or chartreuse to create a more dramatic or earthy look.

A bathroom with a monochromatic color scheme creates a sophisticated look that’s simple to achieve. You can use the same color throughout the entire room to create a cohesive look or choose different tints of the same color to achieve a more dynamic effect.

While green may not be the first color that comes to mind when considering a bathroom, it can be a gorgeous complement to traditional or modern designs. Whether adding a hint of mint to the shower curtain or drenching the space in a soothing sage, green can make your bathroom feel more vibrant and energetic.

Using green in your bathroom remodel is also an excellent way to increase your home’s energy efficiency. Installing new, high-efficiency appliances and fixtures will reduce the amount of fossil fuels used to heat your home and water. Similarly, radiant heating systems use less energy than forced air furnaces and can also reduce the circulation of dust and other allergens throughout your home.

Choose low-VOC paints, adhesives, and sealants to achieve a healthier living environment during your remodel. These products will emit fewer harmful chemicals into the air during application and throughout their lifespan, making your bathroom feel like a toxin-free spa.

Look for tile that is made with recycled content as well. In addition to reducing waste, these tiles are durable and can create a stunning aesthetic in the bath. Many of these options are glazed or polished, making them easy to clean and resist moisture and mold growth. Additionally, consider using natural wood trim and door and window casings, which are sustainable and look as beautiful as their conventional counterparts.

Planting a few plants is another great way to incorporate green into your bathroom. Not only will they add a pop of color, but they’ll also improve your indoor air quality by releasing oxygen. Some of the most popular choices include ferns, jade, and aloe vera.

Finally, you can incorporate green in your bathroom by painting the walls a unique shade of green. There are many shades of green to choose from, so you’re sure to find one that suits your personality. If you’re unsure where to begin, try using a color swatch to narrow your options and decide what hue would work best in your bathroom.

Incorporating rock-filled floors in your bathroom remodel design creates a calm aesthetic that will make you feel like you are entering your spa. The texture of the flooring adds interest to a room and makes it easier to keep clean. It may be a bit more expensive than traditional tile, but the energy savings and comfort it provides will make it worth it in the long run.

Consider adding a geometric floor pattern to your remodel if you want a more modern style. These patterns can complement or contrast other details in your bathroom, such as the shower tile or backsplash. The straight lines of the pattern show off a contemporary style, and this design is suitable for a wide variety of bathroom styles.

Natural stone is a popular choice for bathroom floors, but this can be expensive and a safety hazard if it needs to be properly heated. You should install a radiant floor heating system to avoid slipping and falling. This will also save you money on your energy bill and keep your feet warm throughout the year.

Another way to add stone is to use it as a backsplash behind your sink or tub. It’s a durable material that can stand up to water, and it also looks great with other materials, such as wood or tile. If you want to spend less money on stone, porcelain tiles that mimic the look of almost any type of natural stone are available.

While hiring a professional designer can help you develop the best bathroom remodel design, it is optional to get your dream space. Research and creativity can help you find a style that fits your personality and meets your functional needs.

A bathroom is one of the most used rooms in a home, so it is important to create a space you love. With the right bathroom remodel, you can have a space that will be comfortable and stylish for years to come. Contact Compelling Homes to begin your project today.

The Benefits of Green Construction

J&R Construction is a growing segment of the building industry. Going green has several benefits, including energy efficiency and water conservation.

construcxtiob

Many trade schools and labor organizations offer training programs for those interested in green construction careers. Some require certification or licensure, which usually involves passing an exam and meeting education, work experience, or training requirements.

Energy efficiency is one of the main benefits of green construction. It reduces a building’s environmental footprint by using renewable or recycled energy sources, minimizing the amount of embodied energy used to extract, process, and install building materials, and reducing the operating energy needed for equipment heating and lighting. It also reduces waste by recycling construction materials and utilizing sustainable technologies during the design and build phases of construction, operation, and maintenance.

Many architects and engineers use various techniques to design energy-efficient buildings cost-effectively. For example, a long, narrow building shape maximizes daylight in interior workspaces while minimizing solar heat gain and glare. Operable windows allow natural ventilation in temperate weather and can be used to reduce air conditioning in warmer climates. Low-emission glass limits interior solar heat gain and glare, while skylights and clerestory windows provide daylight to interior spaces.

Green building practices can further minimize a building’s environmental impact by reducing site impacts, for example, by avoiding unnecessary on-site grading or using alternative materials to replace traditional ones. The location of a building can also minimize its effect, for example, by choosing to locate a new retail store within walking distance of the existing community rather than driving customers to an out-of-town shopping mall.

Currently, the value of green nonresidential building construction is growing rapidly, and this growth will likely continue as green building becomes more widely adopted by developers, lenders, and investors. However, up-front costs for green construction, including design fees and longer construction times, are still higher than those for standard buildings. Eventually, valuation methods that consider these life-cycle costs when assessing the value of green buildings may be developed.

A green construction is a building that uses renewable materials that are environmentally friendly, safe, and healthy. These materials are sourced locally, reduce energy consumption and emissions, and provide on-site renewable energy. In addition, these materials are durable and cost-effective. They are also more aesthetically appealing. These features make green buildings more attractive to tenants and potential buyers and boost a business’s public perception as an environmentally responsible company.

Some of the most popular green construction materials include engineered wood products, bamboo, hempcrete, and recycled-content products. These materials produce less waste and are more energy-efficient than traditional wood-based products. They also support local economies and reduce the environmental impacts of raw material mining.

Another popular green building material is recycled aluminum. This material is highly flexible, has a low carbon footprint, and is easily recycled into new products. In addition, it is lightweight, reducing the transportation burden and making it easier to handle at the construction site.

Finally, bamboo is a versatile green construction material that is naturally insect-resistant and can replace lumber. Its rapid growth rate and regenerative properties make it a sustainable option for commercial and residential construction projects.

Using green building materials reduces the amount of waste produced during construction and provides on-site solutions to reduce waste from occupants. Green construction can also minimize the amount of water and energy used in a building, reducing expenses.

However, it’s important to note that no product is 100 percent eco-friendly. Some manufacturers use “green” as a marketing gesture, and there is no single standard for what constitutes an eco-friendly material.

While the construction industry is a necessary part of modern life, it also significantly impacts the environment. However, new processes are being used to minimize this effect during building and designing buildings that operate sustainably for many years. That is known as green construction.

One of the primary focuses of green construction is to improve indoor air quality (IAQ). That involves using low-VOC emitting building materials, interior components, and paints and implementing strategies for adequate ventilation and air cleaning. Green construction also works to limit outdoor pollutants by regulating HVAC systems and implementing air pollution monitors in construction areas.

According to studies, occupants in green buildings report better IAQ than conventional buildings. Green buildings are more energy efficient, so they use fewer natural resources, which means fewer air pollutants. Additionally, green buildings use fewer chemicals, emitting fewer toxins into the air.

Nevertheless, there are still issues with IAQ in green buildings. In particular, it is important to investigate and remediate mold problems quickly. High humidity, leaks, or floods can cause that. Testing for radon and ensuring that the building meets EPA standards is also essential. GrayWolf meters are a great tool for portable IAQ testing, long-term IAQ trend logging, and continuous monitoring in green buildings. That helps maintain healthy and productive occupants while reducing energy costs. Contact us today for more information about how we can help you improve your IAQ and achieve a healthy building. Jon Schoenfeld is the energy and building technology vice president at Buildings IOT.

Green buildings and homes are not only more energy efficient, but they also often sell for more money at resale. These factors make green construction a smart investment.

Many homebuilders and homeowners opt for green building materials and construction techniques to reduce energy costs. That is because a building constructed with these materials and methods uses less electricity and gas than one that does not, which can save homeowners money on their utility bills.

Many homeowners also opt for green home improvements to increase the resale value of their property. Several studies have shown that homes that are green-certified or built to green standards sell for more than those not, even when comparable properties are located in similar areas.

The value of green construction has increased dramatically over the past few years. Green nonresidential building was valued at $3 billion in 2005. 2010, it was estimated to be worth between $43 billion and $54 billion. This growth is expected to continue as more builders and homeowners recognize the benefits of green construction.

This study’s findings showed that, on average, green homes sold for about an 8% premium above code minimum homes. However, the resale value of green homes could be significantly higher if the right tools are in place to capture this value. These tools include providing a clear definition of green, avoiding self-reporting that can lead to inconsistent standards and “greenwashing,” and making it easier for lenders and financial markets to understand the long-term performance of green buildings and their impact on real estate values.

Buildings are responsible for an enormous share of global greenhouse gas emissions and energy, water, and materials consumption. Green construction seeks to reduce and ultimately eliminate these impacts in new buildings. , these buildings can run on renewable resources more efficiently, create superior indoor air quality, preserve natural habitats, and protect the environment for years to come.

During the design phase of green construction, architects and engineers use computer software to create more environmentally friendly plans than traditional methods. These plans can reduce energy and water waste, prevent contamination of the surrounding area, and limit the amount of chemicals used in construction. The construction crews building green buildings also receive specialized training on minimizing their impact.

Green construction also requires that builders use renewable or recycled materials to lessen the building’s environmental footprint. That includes using straw, sheep’s wool, hemp, and compressed earth blocks to make walls, floors, and ceilings. It also means using solar panels, wind turbines, and geothermal heating to save energy costs and lower carbon emissions.

One big way that green construction affects the environment is through site selection. When selecting a new green building site, the builders try to find areas that can take advantage of natural features, such as proximity to the sun and prevailing winds. Avoiding sites that host endangered animals or eroding watersheds is also important.

Another aspect of green construction is smart growth, a concept that encourages developers to keep building on existing sites rather than sprawling out into new areas. That can help preserve farmland, forests, and natural areas, protect air and water quality, and promote public transit use. It also allows for the creation of parks and other community gathering spaces.

The Advantages and Disadvantages of Building a Log Homeu

Building a log home is a dream come true for many people. However, it’s important to enter into the venture with your eyes wide open. Some major concerns with log homes are: settling, water damage and rotting and pest infestation. Luckily, most of these issues are easy to catch and address early by professionals at https://richardsonloghomes.com/.

Log Homes

Eco-Friendly

Log homes offer an eco-friendly option because they use natural materials. Many are also energy efficient, helping to lower the owner’s utility bills and reducing their carbon footprint. In addition, fewer paint chemicals are used to finish the home, which is better for your health and the environment.

Many of the other building materials that go into a log home are eco-friendly as well. They are often made of recycled wood, for example. They may also be made of other renewable materials, such as fiberglass and cork. Many are also pre-fabricated in kits that can be shipped to a construction site and assembled in a fraction of the time it takes to build a traditional framed house.

When it comes to the logs that make up a log home, modern builders make sure they are harvested from sustainable forests. They also make sure the logs are treated for moisture resistance, which helps to prevent rot and insect infestation. This moisture control system includes using waterproofed, fungicide-treated wood, as well as generous roof overhangs and drainage systems. Proper staining, reapplied every few years, can further protect the wood from damage and prevent moisture problems in a log home.

A log home can be finished in a variety of ways, from the traditional rustic look to a more modern style with drywall or other sidings. Some even include windows and doors that are hand-carved with animals or scenery to create a unique look. While the choice of finishing touches is a personal one, most people who live in log homes agree that it adds to their appeal.

As more and more people become environmentally-conscious, log homes have grown in popularity. In addition to using green building techniques, log home owners can make small changes in their daily routine that can help save energy and money. For example, they can collect rain water to use in the home for washing and bathing. This water is cleaner than tap water and it doesn’t contain any toxins, pesticides or other chemicals.

Some of the most important things that a homeowner can do to make their log home eco-friendly is to have it regularly inspected by professionals who have experience with this type of building. A good home inspector can identify and recommend solutions to a wide range of issues. Oftentimes, these are minor and inexpensive to fix but they can contribute significantly to the overall energy efficiency of a log home. They can also help to protect the value of the home, and avoid expensive repairs down the road.

Long-Lasting

Log homes last much longer than traditional homes made with stick-built construction. The wood is a natural insulator, keeping interiors cool in summer and warm in winter. Logs are also very strong and resist damage from severe weather, such as high winds and snowstorms.

As home buyers become more environmentally-conscious, many are opting for log homes made with sustainable fir or spruce. This allows builders to provide the aesthetics and functionality of a log cabin without cutting down large numbers of trees. This means that the remaining forests can be protected and the earth will stay healthy for the future.

However, the longevity of a log home will depend on its care and maintenance. Regular inspections are key to maintaining the integrity of a log home, and the inspection should be done by a certified professional. This person should have experience in examining and assessing log structures, as well as the unique properties of different types of timber.

For example, it is important to check that the chinking (the sealant between logs) is in good condition. If the chinking is cracked, missing chunks or leaking, it will need to be re-applied. The caulking around windows and doors should also be inspected to make sure that it is not worn or torn.

It is also a good idea to inspect the foundation of the log home. If the logs are not properly anchored to the concrete or steel, they will eventually shift and settle. This will transfer the weight of the log walls to the partition walls, which are usually framed conventionally and are not designed to bear this load. This can cause expensive repairs.

A new log home will receive a certificate of occupancy from local building inspectors, but these inspectors are not trained in evaluating the unique properties of a log structure. A certified professional who is experienced in examining log homes can help to identify potential problems that may not have been apparent when the house was built. These can include settling, leaks and insect infestations. In addition, a qualified home inspector can offer tips and recommendations for dealing with these issues.

Easy to See Damage

Many log home maintenance tasks are identical to those homeowners should perform on conventional homes, such as ensuring that gutters are clean and that the roof is sound. However, there are some specific tasks that should be performed on a regular basis that are unique to log homes. These include cleaning the exterior of the home twice a year and inspecting the condition of the logs. This includes checking for mildew, white powder and signs of insect infestation (carpenter bees, ants or termites).

Logs are vulnerable to wood-eating insects such as carpenter bees and ants, and pest damage is not covered by homeowner’s insurance. In addition, the logs themselves are susceptible to water damage and mold. This can be very costly to repair and may require a full restoration. Therefore, a home inspection by a certified log home inspector is a great idea before buying a log home.

Major rot problems are common in log homes, especially older ones. This is because the logs are constantly exposed to moisture. This can lead to the deterioration of the logs, and it is often caused by leaky gutters, poorly installed base flashing or splashing water from sidewalks or gardens located too close to the log walls.

While rot is not a problem in newer log homes, it is an issue in older ones that have been neglected. If not treated and corrected promptly, it can cause serious structural problems and damage to the home. This is because the rot can cause gaps between the logs, which will allow moisture to enter and damage the interior.

Many people who purchase log homes are not aware of the extra maintenance required for them. This is because most do-it-yourselfers use a power washer to clean their logs and do not know that this can actually cause the wood to dry out and shrink. Using a power washer can also erode the protective sealant that keeps moisture out. Instead, log home owners should choose a high quality oil stain that is applied according to the manufacturer’s directions and maintain a regular maintenance schedule to prevent rot and water damage.

Pest-Resistant

Log homes have a distinct advantage over stick-built homes when it comes to bug infestation. Because logs are harder to penetrate than drywall or other materials, they tend to repel insects. However, this does not mean that a bug-free home is guaranteed. In fact, if the logs are not prepared and treated appropriately prior to construction and throughout the time of ownership, bugs will eventually find their way into your cabin.

Pests such as carpenter ants, wood-boring bees and termites are more likely to invade log cabins than other types of houses. The problem is that the insects are searching for food and are attracted to soft wood, which provides a buffet for them. Infestations can be prevented by maintaining the proper moisture levels in your cabin. Using borate treatments before and during construction will help keep the logs from being attacked by pests. Additionally, a fungicide treatment will help to prevent fungal decay that could lead to rot and mold in the logs.

In addition to preventing moisture problems, avoiding ground contact between the logs and soil is also key to protecting your logs from bug infestation. The best way to do this is to install a foundation that is at least 8” from the ground and is made out of concrete. Spreading a barrier of termite sand around the outside of your log home will also deter these pests as they cannot dig through concrete.

Another key step is to maintain your log cabin’s chinking and staining. A good chinking should form a seal between the logs, and the stain will protect from sun damage. This is a must since UV Rays break down the outer surface of the wood and can cause rot, mold, fungus, and insect infestation.

Finally, it is important to regularly check your cabin for bugs and other problems. Make sure to look in the crevices and cracks for signs of bugs or critters such as a white powder or droppings. Also, be sure to check for sagging rooflines and the foundation for signs of bugs or water leakage. Preventing bugs from invading your home is much less expensive and invasive than dealing with the problem after it becomes an issue.

Navigation